


Electronic Product Development Process:
Stages, Builds and What Drives Cost
Electronic product development moves through six stages: requirements, architecture and feasibility, prototype, engineering validation (EVT), design validation (DVT) and production validation (PVT). Cost depends mainly on electronics and firmware complexity, mechanical design and tooling, approvals, test equipment and the number of design iterations.
This guide explains each stage, what you should have at the end of it, and what drives the cost, so you can plan a budget and compare quotes. If you want to talk to an engineering team about your product, see our electronic design services.
The Stages at a Glance
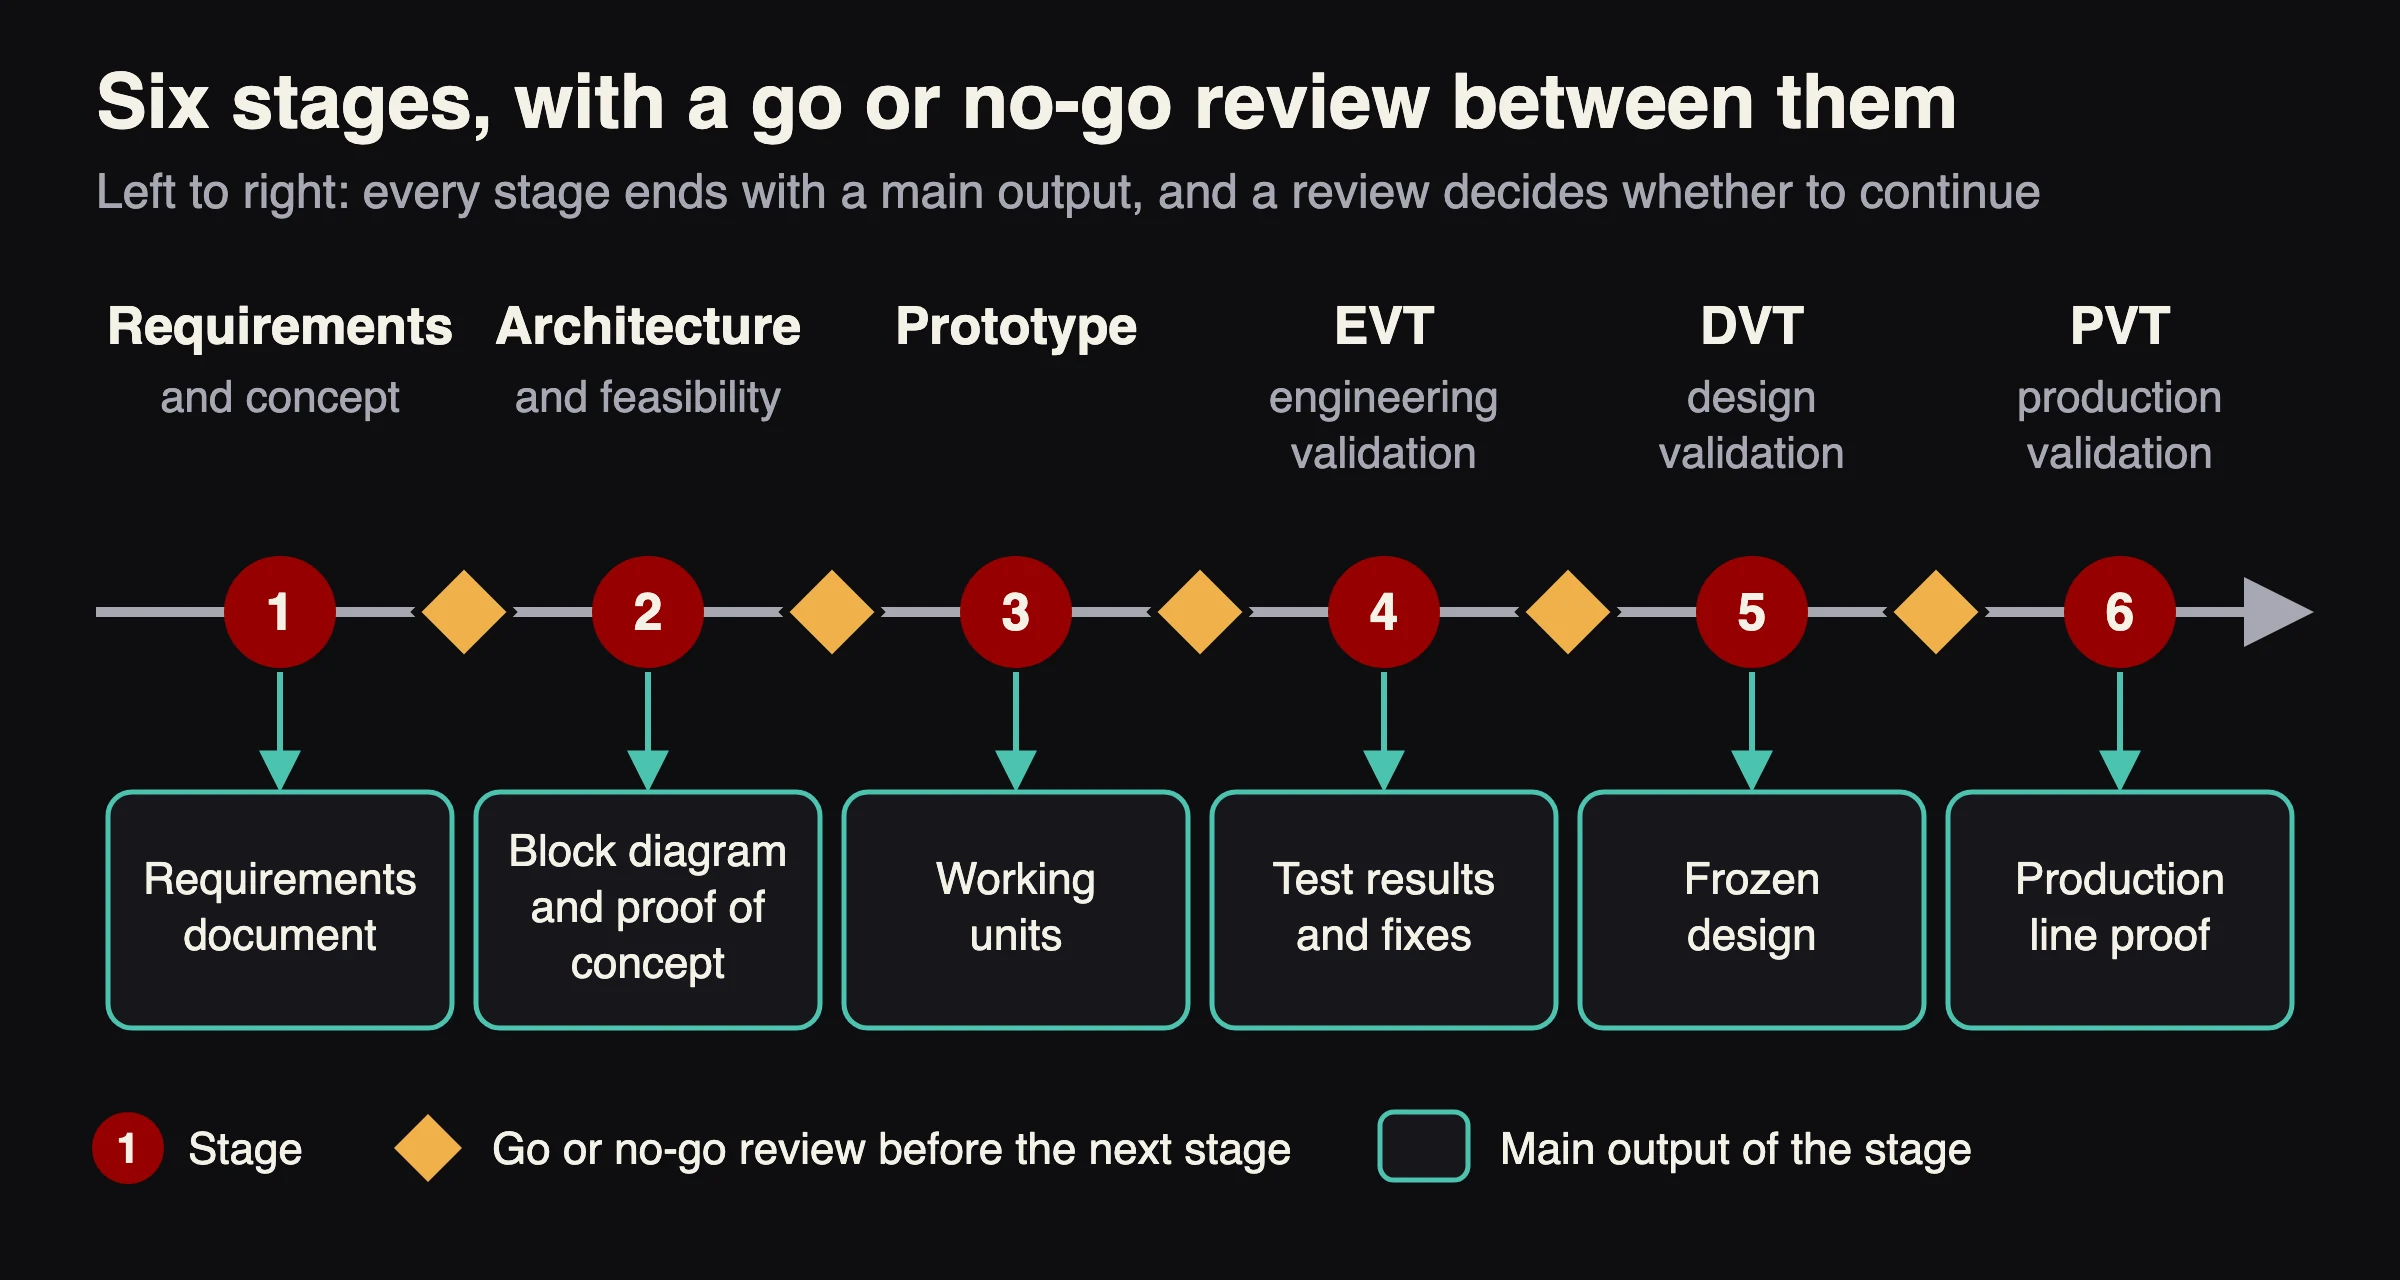
| Stage | Goal | What you should have at the end |
|---|---|---|
| 1. Requirements and concept | Agree what the product must do | A product requirements document: function, environment, interfaces, volumes, regulatory path, target cost and date |
| 2. Architecture and feasibility | Prove the risky parts can work | Block diagram, key component choices, a risk list and proof-of-concept results on development boards |
| 3. Prototype | First working hardware and firmware | A small number of working units, a bill of materials and design files that a manufacturer could quote |
| 4. EVT (engineering validation) | Check that the first engineering prototypes meet the design goals | Test results against the specification (function, power, signal quality, electromagnetic interference (EMI) pre-scan, thermal) and a list of design fixes |
| 5. DVT (design validation) | Prove the design meets every specification and survives real use | Environmental, reliability and conformance results, electromagnetic compatibility (EMC) and safety testing, and a frozen design |
| 6. PVT (production validation) | Prove the factory can build it at target cost | Yield and test data from the production line, quality procedures, end-of-line test and units fit to sell |
What Happens in Each Stage
EVT, DVT and PVT are designations commonly used in the consumer electronics industry, according to a glossary from the BYU Design Review at Brigham Young University. Some companies spell EVT, DVT and PVT with validation (engineering validation test) and others with verification; the BYU glossary and Wikipedia use verification. The stages are the same in practice.
1. Requirements and Concept
Write down what the product does, where it will be used, the interfaces and power, the volumes, the regulatory path and the target cost. Errors here are among the most expensive to fix, because every later stage builds on them.
2. Architecture and Feasibility
Choose the main building blocks, such as the processor, sensors, power system and radio, and test the riskiest ones early. Proof of concept on development boards can show whether a sensor, algorithm or radio link works before you design a board.
3. Prototype
A prototype run is a small number of working units, built by hand or with rapid methods. Each unit costs far more than a production unit, because there is no volume and few cost optimizations yet. The aim is a design stable enough that a manufacturer can quote it. CRATUS describes why hardware projects fail at this stage in Why Hardware Projects Fail in Prototyping. The prototype stage shows that the design can work at all. EVT then tests the first engineering prototypes against the written specification and records pass or fail results.
4. EVT: Engineering Validation
According to Wikipedia, EVT is performed on the first engineering prototypes to check that the basic unit performs to the design goals and specifications. Typical tests include functional checks, power measurement, signal quality, conformance, an EMI pre-scan and thermal tests. The BYU Design Review gives the primary concern of this stage as functional viability. Plan for more than one EVT build if the first one finds significant flaws.
5. DVT: Design Validation
DVT is an intensive test program that checks every product specification, interface standard and customer requirement. Wikipedia lists functional, performance, climatic, reliability, environmental and mechanical testing, plus EMC testing and certification and safety certification. The BYU Design Review describes the focus as turning the function proven in EVT into a desirable physical product. For a product with a radio, formal regulatory testing normally belongs here. At the end of DVT, the design should be frozen.
6. PVT: Production Validation
PVT proves the factory process. The BYU Design Review gives its primary concern as manufacturing effectiveness at mass producing the design that came out of DVT. Units are built on the production line with production tooling, and yield, cycle time, end-of-line test and quality procedures are put in place. Changes after this point are expensive, because tooling and approved processes are already fixed.
How Many Units Does Each Build Use?
There is no standard size, and manufacturers and engineering firms quote very different numbers. The right size depends on product complexity, unit cost and how many configurations you must test, and each stage usually builds more units than the one before. Ask your assembly partner for a proposed quantity for each build and the reason for it. Stage names and quantities vary between companies, but the logic is the same: prove the concept, prove the design, prove the production process.
One-Time Cost Versus Cost Per Unit
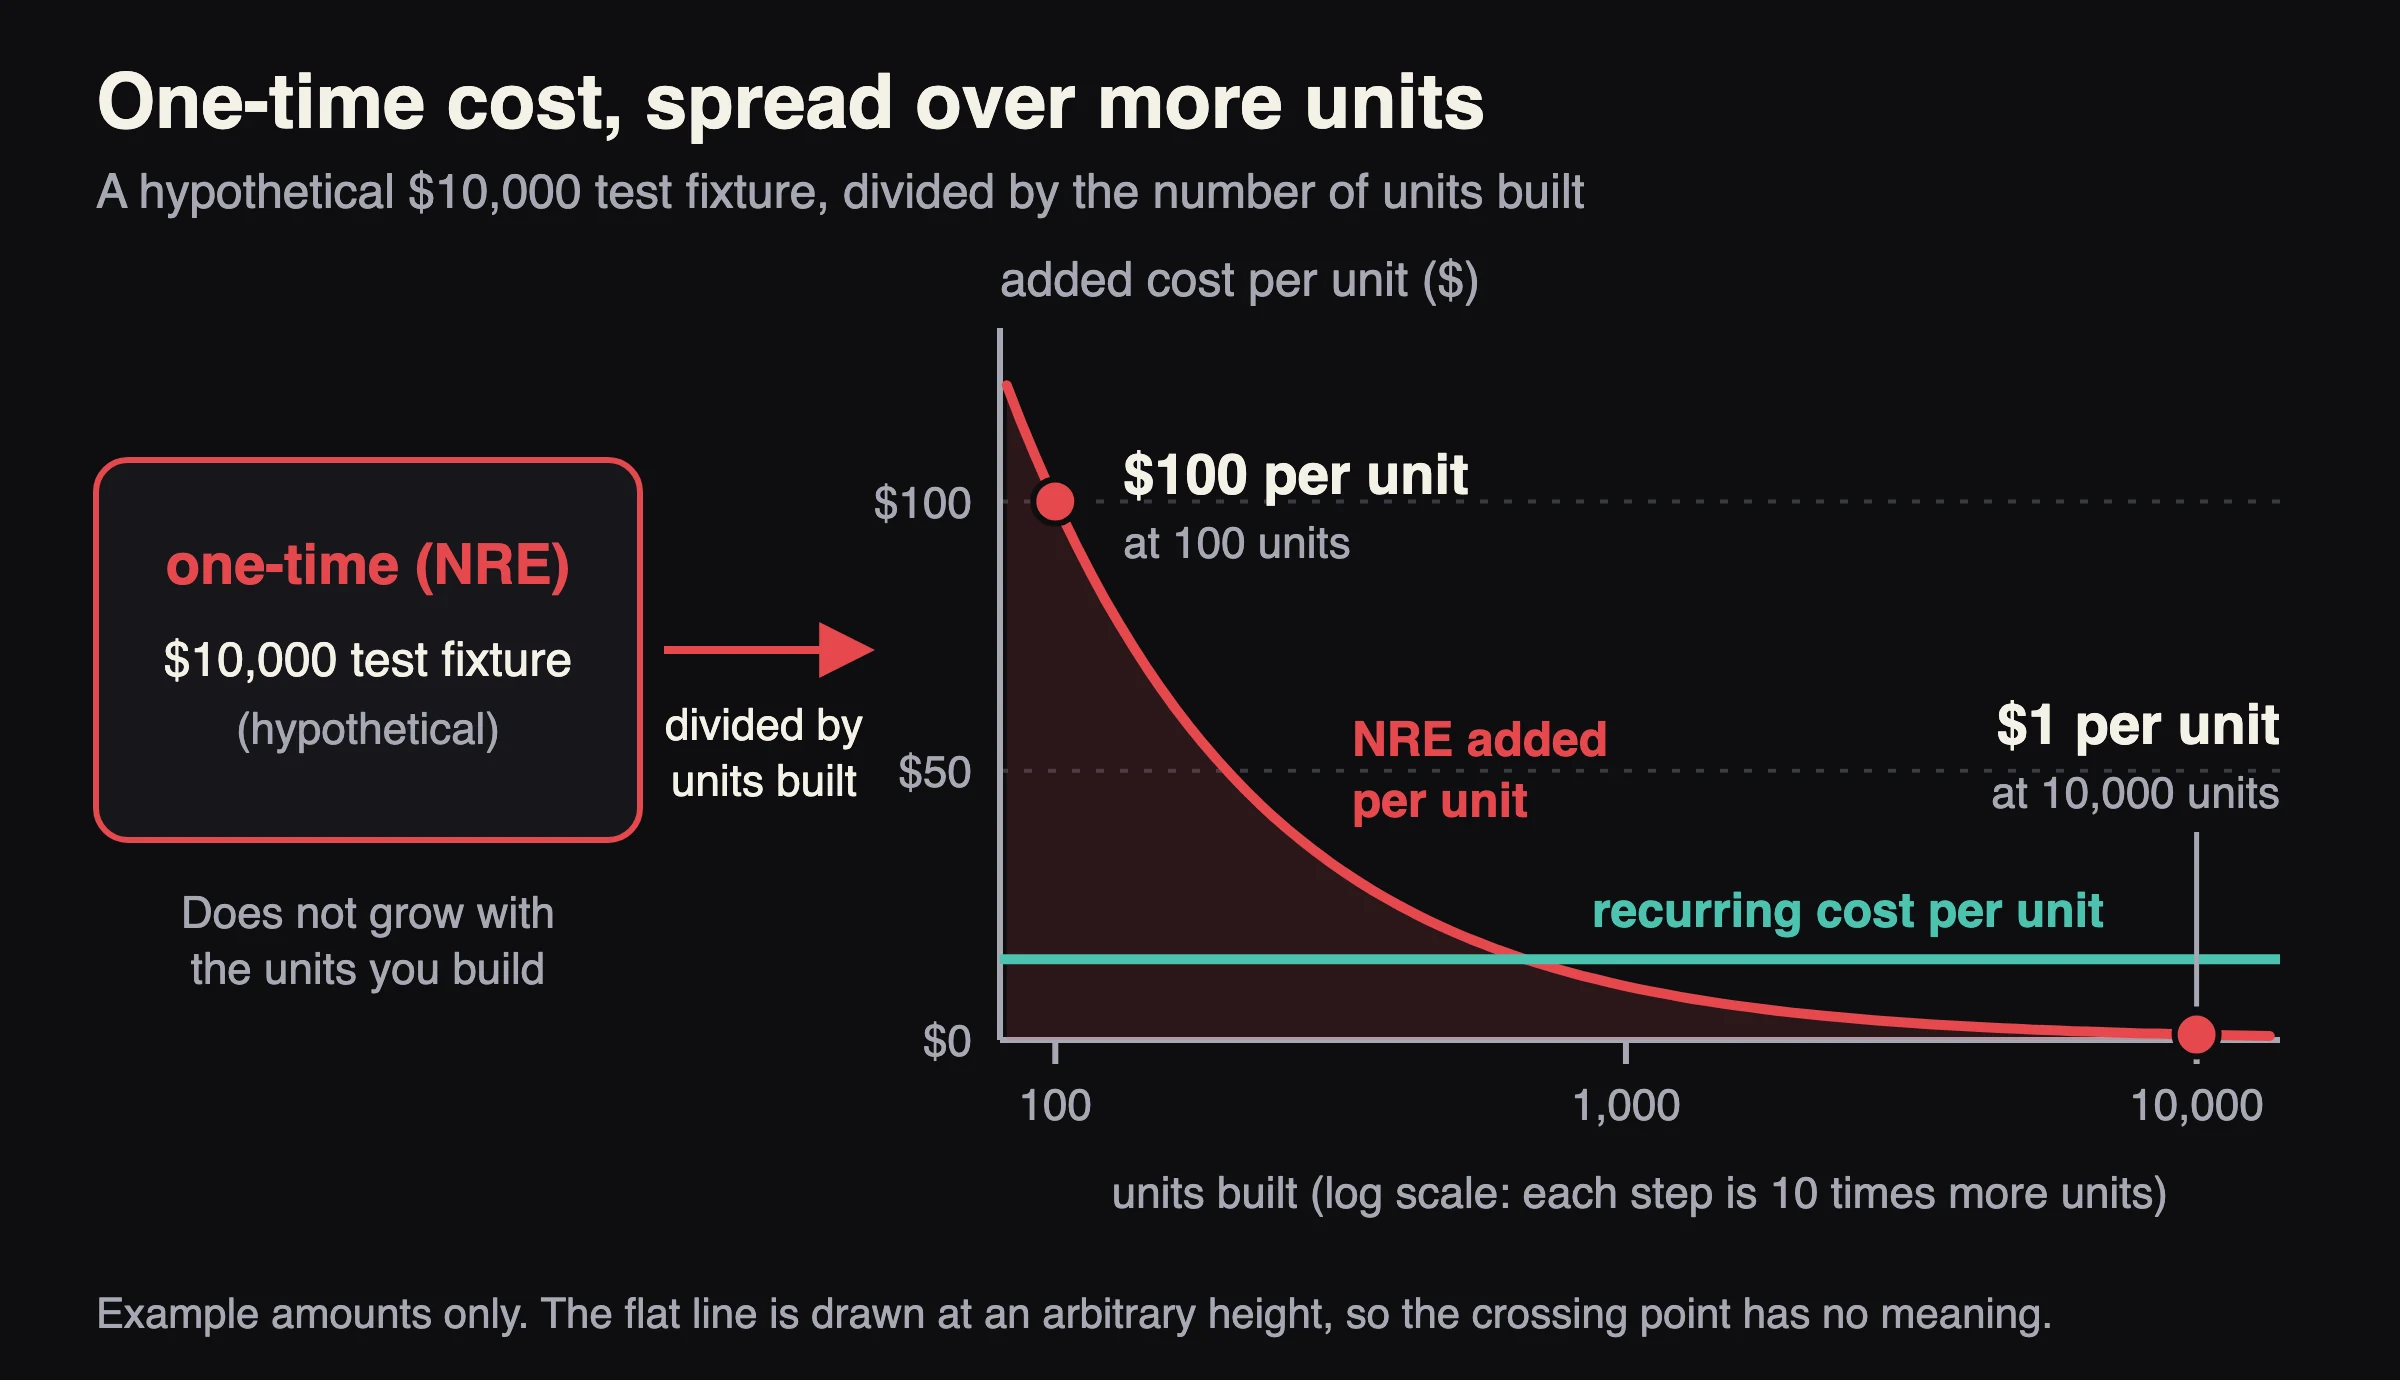
Product cost has two parts. Non-recurring engineering (NRE) is the one-time cost to research, design, develop and test a new product, according to Wikipedia. For an electronic product it usually means design work, prototypes, software and firmware, tooling, test systems and certification. Unlike production costs, which are paid for every unit, NRE does not grow with the number of units you build. Recurring cost is what each unit costs to make: parts, assembly labor and logistics.
NRE is spread over the units you build. As an example, a one-time $10,000 test fixture adds $100 to each unit if you build 100 units, but only $1 per unit if you build 10,000. The amounts are only an illustration, but they show why a quote based on parts cost alone can be misleading for small runs.
In Figure 2 the flat line stands for the recurring cost of one unit, drawn at an arbitrary height. Where the falling one-time cost per unit drops below that line, parts and assembly cost more per unit than the one-time cost.
To plan a budget, add the one-time cost of every stage you expect to pay for, plus an allowance for at least one extra design iteration. Then add the recurring cost per unit times the number of units. In short: total cost = NRE + (recurring cost per unit x units built). Divide the total by the units built to get the full cost per unit.
What Drives Cost
- Electronics complexity. High-speed digital, radio-frequency (RF), power conversion, precision analog and field-programmable gate array (FPGA) designs take more design, layout and test effort than a simple controller board.
- Firmware and software. Often underestimated. Drivers, communication stacks, security, over-the-air updates, cloud connection and test software often takes more effort than the board. See our firmware and software services and why we build hardware and firmware together.
- Mechanical design and tooling. Enclosures, seals, brackets and especially molded parts add design work and one-time tooling cost.
- Certification and testing. In the United States, RF devices must be authorized under 47 CFR part 2 (Title 47 of the Code of Federal Regulations) before they are marketed or imported, according to the Federal Communications Commission (FCC). The term covers products that transmit and also digital products that only emit radio-frequency noise unintentionally, so even a board without a radio can need emissions testing. Other markets and products have their own safety, EMC or industry approvals, such as CE marking in the European Union. Plan these early.
- Test equipment. End-of-line testers, fixtures and calibration software are NRE, and they pay back through yield and quality.
- Number of iterations. Each extra board spin (one more design-and-build cycle of the circuit board) or build adds fabrication, assembly, testing and engineering time. Late changes cost more than early ones.
- Component and supply chain risk. Single-source or long-lead parts can force a redesign.
- Documentation. Production-ready drawings, a bill of materials, assembly instructions and test procedures take time but save it later.
How to Keep Cost and Risk Under Control
- Freeze requirements before layout, and track changes after.
- Prototype the riskiest part first instead of the whole product.
- Fund in phases, with a go or no-go review at the end of each stage.
- Use pre-certified radio modules where they fit, and book pre-compliance testing before the formal tests.
- Review the design for manufacturing and test before the first EVT build.
- Design in debug access and test points from the first spin.
- Choose parts with long lifecycles and second sources.
- Keep one team accountable for hardware, firmware and test where you can, to reduce hand-off delays.
How to Get a Useful Quote
Share a short brief with the points listed in stage 1, and ask what is included in the estimate and what would change the price. There are three common ways to engage and pay for the work, and each trades cost against risk:
- Time and materials. You pay for the hours worked, plus parts. It suits short engagements. For long projects it is the highest cost approach, with the highest cost per engineering hour.
- Ongoing engagement. Steady weekly payments over two, three or four quarters. It gives the lowest cost per engineering hour, and a fixed periodic spend that is known in advance.
- Phased project. A price for each phase of the work. It can be somewhat more expensive, because the design team takes on part of the risk for your product. That removes risk for you, but phase approval cycles often cause delays.
CRATUS offers time and materials, weekly engagements and fixed-scope projects, plus prototype-to-production support and flexible intellectual property (IP) arrangements. See our engineering innovation services page.
How CRATUS Works
CRATUS is one team of electronics, mechanical, firmware and FPGA engineers, with prototyping, test systems and early manufacturing support. We describe our approach in Accelerate Innovation with Team-in-a-Box. Browse all CRATUS services or send us a brief through the electronic design services page.
Sources
- BYU Design Review: Useful Acronyms and Abbreviations in Product Development
- Wikipedia: Engineering validation test
- Wikipedia: Non-recurring engineering
- Federal Communications Commission: Equipment Authorization
Last updated: November 14, 2026. Prepared by the CRATUS engineering team.
Frequently Asked Questions
What are the stages of electronic product development?
Requirements and concept, architecture and feasibility, prototype, engineering validation (EVT), design validation (DVT) and production validation (PVT). Names and build sizes vary between companies.
What is the difference between EVT, DVT and PVT?
EVT checks that the first engineering prototypes meet the design goals and specifications. DVT is an intensive test program covering every specification, including environmental, reliability and electromagnetic compatibility (EMC) testing, and is where regulatory testing usually happens. PVT shows the factory can build the design at the volume and cost you need.
How many units are built in EVT, DVT and PVT?
There is no standard. Sizes depend on complexity, unit cost and the configurations to test, and each stage usually builds more units than the one before, so agree the numbers with your assembly partner.
What is NRE in electronics?
Non-recurring engineering is the one-time cost to research, design, develop and test a new product. For electronics that usually means design, prototypes, firmware, tooling, test systems and certification. It is spread over the units you build.
What affects the cost of developing an electronic product?
The main factors are electronics and firmware complexity, mechanical design and tooling, certification and testing, test equipment, the number of design iterations and component supply risk.
How can I reduce the risk of an electronic product project?
Freeze requirements early, prototype the riskiest part first, fund in phases, review the design for manufacturing and test before EVT, and plan certification from the start.
Do I need regulatory approval before selling an electronic product?
It depends on the product and market. In the United States, radio-frequency devices, including digital products without a radio, must be authorized under 47 CFR part 2 before they are marketed or imported. Other products and markets may need safety or EMC approvals, so check early.

Written by
Founder and CEO, CRATUS Technology, Inc.
Zeki founded CRATUS in 2013 and leads the San Jose team building LiDAR volume measurement systems, IoT sensing platforms, and energy and industrial automation hardware.
Full profileLinkedInShare
Interested?


Interested ?
We would be pleased to send you detailed information about our products or services.
Simply enter your details in the contact form below and we will get in touch with shortly.
CRATUS respects your personal information and keeps it safe. By sending this form, you consent to allow CRATUS to store and process your personal information as stated in our Privacy Policy.